

Actions saves time and make you more productive during post-processing. Actions are basically the same thing as macros in Microsoft office. They can be used to speed up repetitive tasks, make quick work of time consuming edits, and give you a little creative inspiration.
For a photographer, web designer it could be saving files as lesser-quality jpegs or making a certain size thumbnail of a picture is frequent.
1. ACTIONS PALETTE

If your actions palette is nowhere to be found, you can activate it under the “Window” menu. Once you do this, you should see a palette similar to the one in this photo. If you don’t have any actions defined yet, you’ll probably just see the “Default Actions” set.
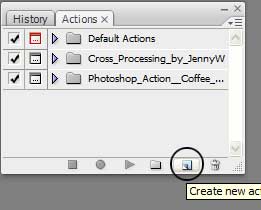
2. CREATE A NEW ACTION
OK now, you’re ready to start the action. For example, I’ll create action for thumbnail images so that it can be used for image gallery.
Before we start recording action, create the action first by clicking on “New Action” ( marked above). Give it a name and a keyboard shortcut if you want.

3.RECORDING ACTION
Simply select your action in the palette and click on the “Record” icon in the lower action menu or select “Start Recording” as given below in the picture. Once you click this button, every event you perform will be recorded. This includes menu items, adjustments, layer selections, and any of the Photoshop tools everything.
4. DO YOUR WORK
Now do whatever, that you wanted to do. Perform all the tasks, clicks, option settings, and image adjustments that you want included in your action. For example i’m going to resize my picture ( for thumbnail ) 250x250. for demo purpose steps here are- Select “Image” menu and choose “image size”
- write width and height of image there.
- Finally press “Ok” button.
5. COMPLETE THE ACTION
So once you’re done, now you have to stop the action. Just press the “Stop” (very first button in Action palette ) button at the bottom of the action palette and Photoshop will stop recording.
Now time to select the other image and just apply these recorded sequences by single click or shortcut key you assigned for the action. To do it , Select Action you created and press the forward arrow mark in action palette OR Simply press the Shortcut key you assigned it while creating action.
1 comment:
Photoshop has always enthused me... this piece of info looks very promising and full of guidance. Thanks shardul for making me go for an initial kill for Photoshop.
Cheers
Alok Anand
Post a Comment